Happy First Fiesta Friday Anniversary Party Part Two!! Week two is all about celebration meals and desserts, so I come bearing cake! I knew I had to go all out for this cake, in case you hadn’t noticed I kind of have a thing for dessert! So I couldn’t just turn up with any old cake, it had to be a real show stopper! And here it is, looking innocent enough when it’s uncut – but all that creamy, whipped vanilla frosting is hiding so much decadence and the perfect cake for such a celebration! I just wish I had better photos of it for you guys, it seems I picked the greyest day of the year to photograph this cake! Also, I’m a bit early to the party but it was either gonna be early or late, so I figured I’d get some cake ready for everybody when they arrive!
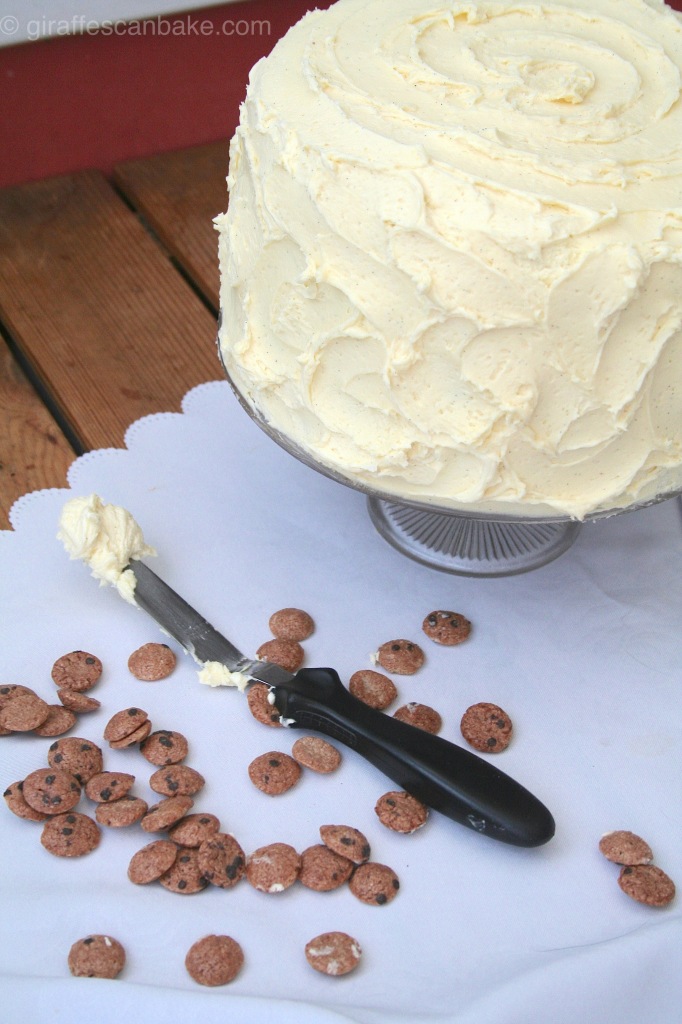
There’s so many wonderful desserts and sweet treats out there, sometimes it’s hard to choose what you want. Cookies? Yum! Cake? Awesome! Cheesecake? Delicious! Mousse? Amazing! So which are you going to choose? Can’t decide? I have good news for you friend – now you can have it all! All in one epic cake! Yep, that’s right! All of that is in unassuming cake, who would believe it? Just wait until you cut yourself a slice…

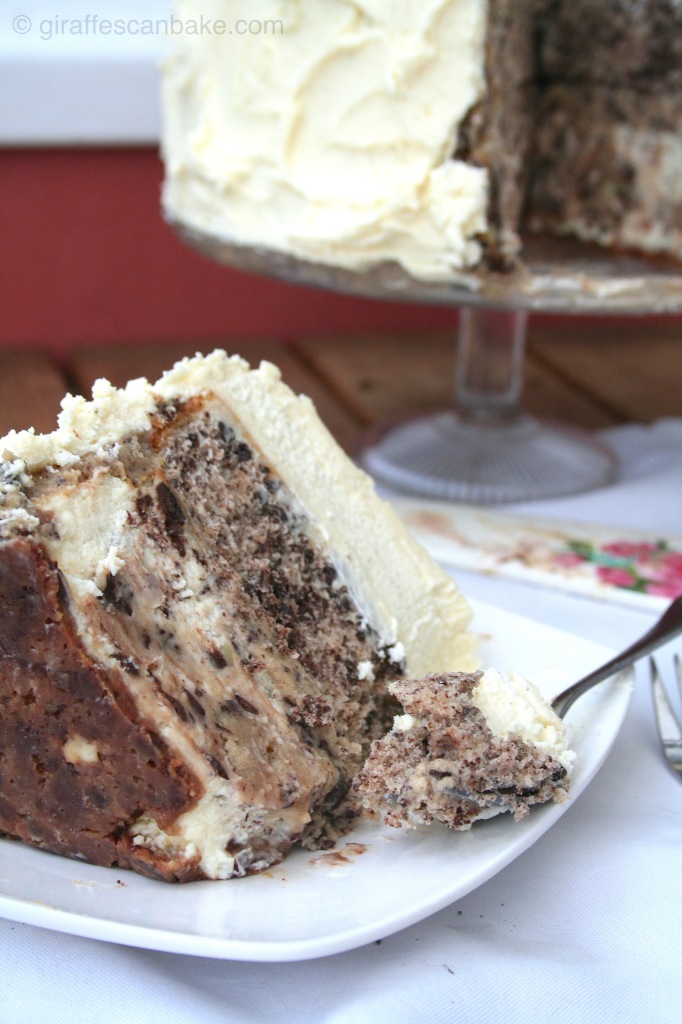
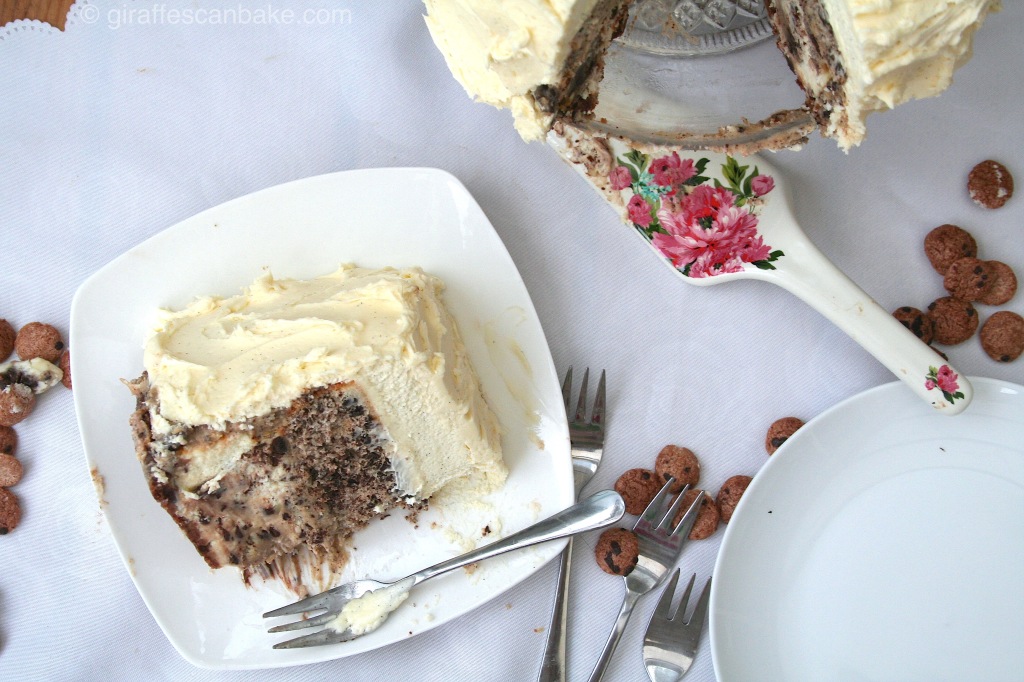
Would you look at that! Let’s talk about what we have here shall we? You might wanna sit down for this…
First we have a chocolate chip cookie crust with a cookie dough cheesecake – that’s right, delicious cheesecake made with both cream cheese and mascarpone for that added creamy sweetness with eggless cookie dough right there in it! It’s so decadent it should probably be illegal… and we’re only on the first layer!
Next we have a layer of cookie dough frosting, oh yeah! This is a recipe from I am baker that I’ve wanted to try ever since I saw it and it did not disappoint. It’s creamy and sweet, and tastes just like a smooth cookie dough. So good!
Then we have a layer of chocolate chip vanilla cake. A light, fluffy cake with finely chopped and chunks of chocolate throughout – it’s the chocolate chip cookie’s cakey cousin!
On top of that we have vanilla bean mousse – a sweet, light mousse to offset the decadent layers below. Don’t underestimate it though, this mousse is intense, smooth and creamy and will make you reaffirm the virtues of good vanilla!
We’re not done yet, we have more cookie dough frosting to come – it covers the bottom two layers of the cake. Because you cannot have too much of this stuff, seriously!
And last, but certainly not least, the cake is covered in a beautifully smooth and delicious whipped vanilla bean frosting. I used this recipe for it, but I used vanilla bean because this cake deserves the very best! You wouldn’t take a Ferrari to a Ford garage for a paint job would you?
And there we have it, the most decadent and outspoken cake I have ever made or eaten! Does anybody need a fan?
I’m not going to lie to you and tell you this cake is a walk in the park to make, it is going to take you a good amount of time to make. But oh boy is it worth the effort! And each separate component is simple enough to make, but you are basically making four desserts and then frosting it – you’re not just going to be able to whip it out in a couple hours one afternoon. I did all the baking and made the mousse one day, then put it all together and made the frostings the next day.

It’s also not the cheapest cake to make. There’s a lot of different ingredients you’ll need, and you really will want to use vanilla pods rather than extract (you’ll need extra too though!), usually I would say go with what works for you and your budget – but you really want the vanilla to shine in this cake, it’s worth the extra money.
This is only an 8″ cake, but I can guarantee you it’s going to go a long way! Even the biggest sweet tooth will have trouble finishing a slice much bigger than an inch thick, this really is decadence at it’s finest! I’m not even going to pretend I’ve thought about the calories and fat in this cake! When you’re making a cake like this one, there’s no point in even worrying about that! After all, this isn’t a cake you’re going to be making every week – there’s nothing wrong with indulging occasionally, we are celebrating after all! So don’t sweat it, life’s too short not to treat yourself every now and then!
The great thing about this cake too is each layer is delicious on it’s own. If the idea of baking this whole thing is a bit intimidating or you just don’t have the time, just make one part and you’ll still be in heaven! I’m definitely going to make the cheesecake part by itself again one day, and that mousse is so smooth and sweet I’m going to have to think of another dessert to incorporate it in soon! And the cookie dough frosting? You can bet your butt I’m going to be putting that on some cupcakes! So while the cake at a whole is an amazing cake worthy of any celebration, the individual components shine just as brightly on their own!

Before I get to the recipe, just wanna remind you to come hang out with me on social media! You can find me on Twitter,Instagram,Pinterest and Facebook.
Also, if you liked this post, why not enter your email address into the subscription box on my side bar to get my future posts directly into your inbox!
I am, of course, taking this to the second instalment of the big FF anniversary party – there’s plenty to go around so dig in! If you’ve not partied with us before, now is a great time to join! Especially with our wonderful co hosts – Nancy and Selma. And of course, a big shout out and thank you to a lovely host Angie, for keeping this awesome party going for a whole year and inviting us along each week, here’s to many, many more!
Now, recipe time! There’s a lot to go through and a lot of steps, so I’m going to break it up for you in two ways. I’m going to type it up right here in the post, step by step for the entire cake, in the order you should be doing it. Then I’m going to include printable recipes for each component so you can print them out or pick and choose the parts!
Don’t let the length of this scare you away! Yes it’s going to take a while, but it really isn’t very hard to do each individual part, I promise!
For the cheesecake
Cookie Dough Balls:
- 115g unsalted butter, softened
- 110g brown sugar
- 2 tbsp milk
- 2 tsp vanilla extract
- 140g plain flour (all purpose)
- 1/4 tsp salt
- 65g mini chocolate chips
Beat butter and sugar in a bowl until creamed and combined. Add milk and vanilla, and beat to combine. Mix in flour and salt until you have soft dough, stir in chocolate chips. Roll into small balls, about 1 tsp of dough per ball. Place balls on a baking sheet lined with parchment paper and place in the freezer while you make the cheesecake batter.
Crust:
- 145g chocolate chip cookies (I used Maryland, use your favourite brand or homemade – crunchy is better than chewy in this case)
- 60g unsalted butter, melted
Line the bottom of an 8″ pushpan or springform pan with parchment paper and lightly grease the sides.
Put the cookies in a food processor and blitz until you have fine crumbs. Stir in melted butter. Press into the bottom of the prepared cake tin until firmly packed and evenly spread out. Place in fridge.
Cheesecake:
- 650g full fat cream cheese, room temperature
- 100g full fat mascarpone, room temperature
- 150g caster sugar (superfine granulated)
- 1 tsp vanilla extract
- 3 large eggs, room temperature
- 80g mini chocolate chips
Preheat the oven to 170C/325F.
Put both cheeses, sugar and vanilla in a large bowl (or the bowl of your stand mixer) and beat together on medium until smooth and combined. Add eggs one at a time, beating in between each addition until fully combined. Only beat until combined, you don’t want too much air in the batter.
Pour half of the batter into the prepared crust. Take the cookie dough balls out of the freezer and stir into the remaining batter, along with the chocolate chips. Pour into the pan and spread out evenly, it might be a bit lumpy that’s okay.
Bake for 60-70 minutes, until the edges are set and the centre is still a bit wet looking. Turn the oven off and crack the door an inch or two, leave the cheesecake in the cooling oven for 1 hour. Remove from oven and cool completely on a wire rack. Remove cooled cheesecake from pan and chill in the fridge for 4 hours or overnight.
For the cake
- 2 large egg whites, room temperature (save the yolks for the mousse)
- 1 whole egg, room temperature
- 165ml whole milk
- 1 1/4 tsp vanilla extract
- 160g plain flour (all purpose)
- 1 tbsp corn flour (cornstarch)
- 200g caster sugar (superfine granulated)
- 1 tbsp baking powder
- 1/4t tsp salt
- 85g cold butter, cubed
- 115g dark chocolate
Preheat oven to 180C/350F. Line bottom of an 8″ pushpan/springform pan with parchment paper, grease the sides.
In a bowl combine the egg whites, whole egg, 45ml of the milk and vanilla. Set aside.
Put the flour, cornflour, sugar, baking powder and salt into the bowl of your stand mixer, remove 1 tbsp of the mix and place in a small bowl for later. Using the paddle attachment, mix the dry ingredients on low for 30 seconds. Add the butter pieces one at a time, keep mixer on low until you have a crumbly mixture.
Add remaining 120ml milk and mix on low for 5 minutes, scrape down sides and bottom of bowl. Add egg mixture in 3 batches, beat until light and fluffy (about 4-5 minutes).
Put the dark chocolate in a food processor and pulse for 1 minute, until you have finely chopped chocolate with a few larger chunks. Stir the reserved tbsp of flour into the chocolate then stir into the cake batter.
Pour batter into prepared pan and bake for 30-40 minutes, until a skewer comes out clean or with a few moist crumbs (you’ll probably get melted chocolate on it, but as long as there’s no raw batter you’re good). Cool in pan for 5 minutes, then remove and cool completely on wire rack. Wrap and keep at room temperature for up to 24 hours.
For the mousse
- 500m double cream (heavy cream), divided in half
- 1 vanilla pod, seeds scraped out
- 1 tsp powdered gelatine, unflavoured
- 3 tbsp cold water
- 3 large egg yolks
- 75g caster sugar (superfine granulated)
Measure out 250ml of the cream (leaving the other 250ml in the fridge) and add to a medium saucepan. Add the scraped vanilla bean seeds and the pod itself. Heat on medium low heat until bubbles just start to form around the edge. Remove from heat, cove and leave to steep for 30 minutes.
Prepare an ice bath – fill a large bowl with cold water and ice cubes, have a slightly smaller bowl sitting in the water (without water spilling into top bowl).
Put the 3 tbsp cold water in a small bowl and sprinkle gelatine over, stir. Leave the bloom for 5 minutes.
In a large bowl, whisk together the egg yolks and sugar until well combined and smooth. Remove vanilla pod from cream and gradually pour the warm cream into the egg mix, whisking constantly. Pour back into the saucepan. Cook over a medium low heat, stirring constantly with a wooden spoon until mixture is thickened and coats the back of the spoon – approximately 5 minutes. Do not boil. Remove from the heat and add gelatine mix, whisk to combine.
Pour the custard mix into the top bowl of the ice bath – leave to cool and thicken, whisking occasionally, until room temperature – about 20 minutes. Set aside.
In your stand mixer with the whisk attachment, whisk the remaining cream on a high speed until soft peaks form (peaks will begin to form but they’ll barely hold their shape, the tips will fold over almost immediately after lifting whisk out). Gently fold half of the whipped cream into the custard until combined, then fold in other half.
Now it’s time to start assembling the cake
Assembly Part 1
Line your 8″ pan (springform works best, pushpan is good too) with parchment paper along the bottom and around the sides – the parchment paper should be sticking up over the top. It can be a bit tricky to line the sides, use tape if you need to.
Place your sponge cake into the bottom of the pan. Pour the mousse on top and spread evenly as possible. Place in the fridge until set, 2-3 hours.
Cookie Dough Frosting
- 150g brown sugar
- 115g unsalted butter, softened
- 175g plain flour (all purpose)
- 1 tsp vanilla extract
- 1/2 tsp salt
- 10-12 tbsp milk
- 150 mini chocolate chips
Beat the sugar and butter on medium speed until smooth. Add flour, vanilla and salt and mix on low until combined. Keeping the mixer on lower, add 1 tbsp of milk at a time, add as much milk as you need to get the desired consistency, since you’ll be spreading this you’ll want it fairly thin. Stir in chocolate chips.
Assembly Part 2
Take your cheesecake out of the fridge and put on the place or platter you’ll be serving the cake on. Spread a layer of cookie dough frosting on top of the cheesecake, you can make this as thick as you like but make sure to leave enough to cover the sides.
Take sponge cake and mousse layers out of the fridge and carefully remove from pan – peel away parchment paper from sides and bottom. Holding it by the cake layer, place it on top of the cheesecake layer.
Spread the remaining cookie dough frosting around the sides but only over the cheesecake and sponge cake layer, leave the mousse bare. Try to spread it as smooth as possible, but don’t worry about it too much. Place in fridge.
Whipped Vanilla Frosting
- 375g unsalted butter, softened and cubed
- 475g icing sugar (powdered/confectioners)
- 3 tbsp milk
- 1 vanilla bean, seeds scraped.
- 1 tsp vanilla extract
- pinch of salt
Put the milk in a small bowl and add the vanilla bean and seeds. Set aside.
Put the butter in your stand mixer bowl and beat with paddle attachment on medium until very pale (almost white) and creamy, about 8 minutes.
Add milk (remove vanilla bean first), icing sugar, vanilla extract and salt and mix on low for 1 minute. Increase speed to medium and beat for 5-6 minutes, until light and fluffy.
Assembly Part 3
Remove cake from the fridge and cover tops and sides with the vanilla frosting. Spread it and present it however you like – I did mine with swirls because I’m not very good at getting my frosting smooth.
Keep cake in fridge until ready to serve.
Pin this recipe:


Cookie Dough Cheesecake
2015-01-28 22:40:44
Creamy cheesecake made with cream cheese and mascarpone, with delicious chunks of cookie dough
- 115g unsalted butter, softened
- 110g brown sugar
- 2 tbsp milk
- 2 tsp vanilla extract
- 140g plain flour (all purpose)
- 1/4 tsp salt
- 65g mini chocolate chips
- 145g chocolate chip cookies (crunchy, not chewy)
- 60g unsalted butter, melted
- 650g full fat cream cheese, room temperature
- 100g full fat mascarpone, room temperature
- 150g caster sugar (superfine granulated)
- 1 tsp vanilla extract
- 3 large eggs, room temperature
- 80g mini chocolate chips
- For the cookie dough balls, Beat butter and sugar in a bowl until creamed and combined.
- Add milk and vanilla, and beat to combine. Mix in flour and salt until you have soft dough, stir in chocolate chips.
- Roll into small balls, about 1 tsp of dough per ball. Place balls on a baking sheet lined with parchment paper and place in the freezer while you make the cheesecake batter.
- For the crust, Line the bottom of an 8" pushpan or springform pan with parchment paper and lightly grease the sides.
- Put the cookies in a food processor and blitz until you have fine crumbs. Stir in melted butter. Press into the bottom of the prepared cake tin until firmly packed and evenly spread out. Place in fridge.
- For the cheesecake, Preheat the oven to 170C/325F.
- Put both cheeses, sugar and vanilla in a large bowl (or the bowl of your stand mixer) and beat together on medium until smooth and combined. Add eggs one at a time, beating in between each addition until fully combined. Only beat until combined, you don't want too much air in the batter.
- Pour half of the batter into the prepared crust. Take the cookie dough balls out of the freezer and stir into the remaining batter, along with the chocolate chips. Pour into the pan and spread out evenly, it might be a bit lumpy that's okay.
- Bake for 60-70 minutes, until the edges are set and the centre is still a bit wet looking. Turn the oven off and crack the door an inch or two, leave the cheesecake in the cooling oven for 1 hour. Remove from oven and cool completely on a wire rack. Remove cooled cheesecake from pan and chill in the fridge for 4 hours or overnight.
- Will keep in fridge for 3-5 days
By Michelle @ Giraffes Can Bake
A Tipsy Giraffe https://www.atipsygiraffe.com/

Chocolate Chip Vanilla Sponge Cake
2015-01-28 22:43:12
Light and fluffy vanilla sponge cake with chocolate chips
- 2 large egg whites, room temperature (save the yolks for the mousse)
- 1 whole egg, room temperature
- 165ml whole milk
- 1 1/4 tsp vanilla extract
- 160g plain flour (all purpose)
- 1 tbsp corn flour (cornstarch)
- 200g caster sugar (superfine granulated)
- 1 tbsp baking powder
- 1/4t tsp salt
- 85g cold butter, cubed
- 115g dark chocolate
- Preheat oven to 180C/350F. Line bottom of an 8" pushpan/springform pan with parchment paper, grease the sides.
- In a bowl combine the egg whites, whole egg, 45ml of the milk and vanilla. Set aside.
- Put the flour, cornflour, sugar, baking powder and salt into the bowl of your stand mixer, remove 1 tbsp of the mix and place in a small bowl for later. Using the paddle attachment, mix the dry ingredients on low for 30 seconds. Add the butter pieces one at a time, keep mixer on low until you have a crumbly mixture.
- Add remaining 120ml milk and mix on low for 5 minutes, scrape down sides and bottom of bowl. Add egg mixture in 3 batches, beat until light and fluffy (about 4-5 minutes).
- Put the dark chocolate in a food processor and pulse for 1 minute, until you have finely chopped chocolate with a few larger chunks. Stir the reserved tbsp of flour into the chocolate then stir into the cake batter.
- Pour batter into prepared pan and bake for 30-40 minutes, until a skewer comes out clean or with a few moist crumbs (you'll probably get melted chocolate on it, but as long as there's no raw batter you're good). Cool in pan for 5 minutes, then remove and cool completely on wire rack.
- Will keep in an airtight container for 3 days
By Michelle @ Giraffes Can Bake
A Tipsy Giraffe https://www.atipsygiraffe.com/

Vanilla Bean Mousse
2015-01-28 22:49:22
Smooth and creamy mousse with an intense vanilla flavour
- 500ml double cream (heavy cream), divided in half
- 1 vanilla pod, seeds scraped out
- 1 tsp powdered gelatine, unflavoured
- 3 tbsp cold water
- 3 large egg yolks
- 75g caster sugar (superfine granulated)
- Measure out 250ml of the cream (leaving the other 250ml in the fridge) and add to a medium saucepan. Add the scraped vanilla bean seeds and the pod itself. Heat on medium low heat until bubbles just start to form around the edge. Remove from heat, cove and leave to steep for 30 minutes.
- Prepare an ice bath - fill a large bowl with cold water and ice cubes, have a slightly smaller bowl sitting in the water (without water spilling into top bowl).
- Put the 3 tbsp cold water in a small bowl and sprinkle gelatine over, stir. Leave the bloom for 5 minutes.
- In a large bowl, whisk together the egg yolks and sugar until well combined and smooth. Remove vanilla pod from cream and gradually pour the warm cream into the egg mix, whisking constantly. Pour back into the saucepan. Cook over a medium low heat, stirring constantly with a wooden spoon until mixture is thickened and coats the back of the spoon - approximately 5 minutes. Do not boil. Remove from the heat and add gelatine mix, whisk to combine.
- Pour the custard mix into the top bowl of the ice bath - leave to cool and thicken, whisking occasionally, until room temperature - about 20 minutes. Set aside.
- In your stand mixer with the whisk attachment, whisk the remaining cream on a high speed until soft peaks form (peaks will begin to form but they'll barely hold their shape, the tips will fold over almost immediately after lifting whisk out). Gently fold half of the whipped cream into the custard until combined, then fold in other half.
- Pour into serving dish dishes (or onto cake for this particular cake recipe), chill in fridge until set - 2-3 hours
- Will keep for 3 days in the fridge.
- I strongly urge you to use vanilla bean, but if not use 1 tsp vanilla extract instead
- If you'd prefer to use sheet gelatine, replace powdered with 2 sheets - soak in water for 5 minutes, squeeze out excess water and add to the custard in the same place in the recipe.
By Michelle @ Giraffes Can Bake
A Tipsy Giraffe https://www.atipsygiraffe.com/
Cookie Dough Frosting
2015-01-28 22:52:43
Creamy cookie dough frosting - tastes just like cookie dough, but without the salmonella
- 150g brown sugar
- 115g unsalted butter, softened
- 175g plain flour (all purpose)
- 1 tsp vanilla extract
- 1/2 tsp salt
- 10-12 tbsp milk
- 150 mini chocolate chips
- Beat the sugar and butter on medium speed until smooth.
- Add flour, vanilla and salt and mix on low until combined.
- Keeping the mixer on lower, add 1 tbsp of milk at a time, add as much milk as you need to get the desired consistency, since you'll be spreading this you'll want it fairly thin (add less milk if you're using it for cupcakes). Stir in chocolate chips.
By Michelle @ Giraffes Can Bake
Adapted from I Am Baker
A Tipsy Giraffe https://www.atipsygiraffe.com/

Whipped Vanilla Bean Frosting
2015-01-28 22:54:56
Light, fluffy and delicious whipped frosting
- 375g unsalted butter, softened and cubed
- 475g icing sugar (powdered/confectioners)
- 3 tbsp milk
- 1 vanilla bean, seeds scraped.
- 1 tsp vanilla extract
- pinch of salt
- Put the milk in a small bowl and add the vanilla bean and seeds. Set aside.
- Put the butter in your stand mixer bowl and beat with paddle attachment on medium until very pale (almost white) and creamy, about 8 minutes.
- Add milk (remove vanilla bean first), icing sugar, vanilla extract and salt and mix on low for 1 minute. Increase speed to medium and beat for 5-6 minutes, until light and fluffy.
- Use immediately, it won't keep well
By Michelle @ Giraffes Can Bake
A Tipsy Giraffe https://www.atipsygiraffe.com/


Apricot Cheesecake with Amaretto Caramel

Blackberry and Elderflower Entremets

Iran Flag Vanilla Cake w/ Strawberries and Kiwi
Sharing with…
Fiesta Friday, Create It Thursday, Cook It! Craft It! Share It!, Foodie FriDIY, Super Saturday, Show Me Saturday, Scraptastic Saturday, Motivation Monday, Frugal Crafty Home, Hit Me With Your Best Shot, Sweet and Savoury Sunday, Project Parade, Inspire Me Wednesday, Bake of the Week