"> i made this - A Tipsy Giraffe - Page 2

Cocoa Brownies

Cocoa Brownies

These are super fudgy and chocolatey brownies that are made with cocoa powder rather than solid chocolate, crazy right?

I was having a major brownie craving but I didn’t have your traditional brownie ingredients in the house. I did however have cocoa, so I threw caution to the wind and these were born! It was the best decision I’ve made in recent history.

Cocoa Brownies

Like most of you probably are, I was put off by the idea of making cocoa brownies. What’s the point in eating brownies if they’re not perfect! But when the craving becomes too strong, you can’t be held responsible for your actions. After some searching on the internet I found this recipe that was adored by so many blogs I came across, the recipe is originally by Alice Medrich and since trying it by myself I can see why everybody was raving! It ticks every brownie box and then some, fudgy delightfulness in every single bite!

Cocoa Brownies

I have a shameful history with brownies. I tried to make them many, many years ago and they came out rock solid (I’m pretty sure J K Rowling modelled Hagrid’s rock cakes on my brownies) and I was distraught. That was about 10 years ago, this is only the second time I’ve made them since (I don’t deal with failure well!), and what a way to restore my brownie making faith in myself! I really do urge you to give these a go the next time you have a real brownie craving and only have cocoa in the cupboards, you won’t regret it and neither will your tummy!

Cocoa Brownies

These brownies are made pretty similarly to your regular brownies and you can do it by hand. You melt the butter, sugar, cocoa and salt together. Let it cool if it’s hot and add the eggs and vanilla, beat the mixture until it’s smooth and shiny and add the flour. Beat hard for a couple of minutes, giving you a pretty thick mixture. I had some m&ms laying around so I mixed those in too. Then bake for no more than 30 minutes and voila, yumminess is in your hands (make sure they’re gloved hands, no burns please!).

Cocoa Brownies

[recipe title=”Cocoa Brownies”]
Ingredients

  • 140g unsalted butter
  • 250g caster sugar
  • 75g unsweetened cocoa powder
  • 1/4 tsp salt
  • 1/2 tsp pure vanilla extract
  • 2 large eggs
  • 60g all purpose flour

Method

  • Preheat the oven to 325F/160C and grease and line 8×8 baking pan.
  • In a large bowl, combine the butter, sugar, cocoa and salt and melt in the microwave in 30 seconds intervals, stirring between until all melted.
  • If the mixture is hot, leave to cool slightly as you don’t want to cook the eggs!
  • Using a wooden spoon, stir in the vanilla. Then beat in the eggs one at a time, combining each time until batter is thick and shiny.
  • Add the flour and stir vigorously for a couple minutes. Stir in any nuts or chocolate chips you may be adding.
  • Pour into pan and spread evenly.
  • Bake for 25-30 minutes until a skewer comes out almost clean, a few moist crumbs is good, you just don’t want them still wet and you definitely don’t want to over bake them!
  • Leave them to cool on a wire rack before cutting into squares. Put them in the fridge for a few hours to get nice clean lines when you cut them!

[/recipe]

Cocoa Brownies

moreposts

2014-03-19 15.37.47

2014-03-19 15.38.59

2014-03-19 15.41.33


Banoffee Pie

Image

As you probably know, yesterday was Pi Day. I’ll take any excuse to eat pie and it has no calories if I make it myself, right? I went with Banoffee Pie because it’s so yummy and there’s no need to fuss with any pastry if you don’t want to. Banoffee Pie is an English dessert, it’s made from bananas, toffee and fresh whipped cream. Mine also has an oreo crust and shaved chocolate because I’m a firm believer that chocolate makes almost everything better!

Image

In case you hadn’t guessed it yet, it gets its name from smooshing banana and toffee together, like a perfect marriage that rivals even your biggest OTP!

I did make this pie on Pi day, but we had a busy day yesterday and after stuffing our face with these amazing black bean flautas (I know this is a baking blog, but you definitely need to try them they’re so good) it was 11:30pm by the time I finished baking the pie, hence why you’re getting this post a day late!

Image

It’s been a very stressful few days for me. I’m in Atlanta right now and I was supposed to fly home to the UK on Thursday night, but I got to the airport only to be told by the checking in agent that they wouldn’t allow me to fly because my passport had been damaged! And I can tell you this now, it’s a very scary thing to be told you’re being denied permission to fly! It’s going to work out okay, I’m still in the US but I’m taking a trip to the British Embassy on Tuesday to get an emergency travel document so I can fly home without a valid passport on Thursday. It’s going to cost me a small fortune and I’m missing a Fall Out Boy concert, but that’s where pie comes in to make me feel better!

Image

The caramel toffee in a banoffee pie is traditionally made by boiling cans of condensed milk but I have never made it that way, it’s not that hard to do but I’m too impatient to wait the few hours it takes – plus there’s also a danger the can could explode if you don’t keep it fully submerged and that sounds like something that would happen to me! I made my caramel by cooking butter, brown sugar and condensed milk until a caramel formed. I’ll be honest with you, I did over cook mine a little and so I ended up with a very hard caramel, which isn’t necessarily bad it’s just a bit hard to eat in pie form! You want to remove it from the heat once it turns thick and golden.

Image

I used an oreo crust, which I just made by crushing whole oreos and mixing them with melted butter (you can crush them in a food processor or, if your food processor is full of spicy avocado dip like ours was, you can get your happy helper to crush them in a bag like I did, thanks Leah!). Then you press it into your pan and allow to cool and harden. You then pour in the caramel and top with a few banana slices (I like some of the banana to get all set in the set caramel yum) and put in the fridge for at least an hour, until completely cooled. Then top with more sliced bananas, whip up some cream and stir in yet more sliced bananas and spoon it over the pie, then just decorate with shaved chocolate

Image

You can, of course, present this much more neatly. You can pipe on the whipped cream and arrange the bananas on top in pretty patterns instead of stirring them into the cream, but I like it all mixed up in the cream. And honestly, I like the messy rustic look for this pie! You obviously want to keep it chilled, just take it out of the fridge about 15 minutes before you plan to serve it. If you’ve never had banoffee before, trust me you’re gonna love it. There’s something about banana and toffee together that tastes so good, honestly toffee without banana just tastes wrong to me! It’s the perfect end to a very stressful week!

[recipe title=”Banoffee Pie”]

Ingredients

For the base:

  • 300g Oreos, finely crushed
  • 90g melted butter

For the toffee:

  • 100g butter
  • 100g light brown sugar
  • 1 can of sweetened condensed milk (396g can)

For the topping:

  • 3 ripe bananas, sliced
  • 250ml double cream
  • Shaved chocolate

Method

  • Grease a 22cm springform tin and line the bottom with parchment paper.
  • Mix the butter and crushed Oreos and press into the tin to make the crust. Place in the fridge while you make the toffee caramel
  • To make the toffee, melt the butter and sugar in a non stick pan over a low heat, stirring continuously.
  • Once the butter is melted and the sugar is dissolved, add the condensed milk and mix well.
  • Bring to a rapid boil, stirring constantly, until you get a thick golden caramel (about 5 mins)
  • Pour onto the Oreo base and press a few banana slices into the toffee, allow to cool, chill for at least an hour
  • Remove the pie from the tin and transfer to your serving plate
  • Place more banana slices over the top, lightly covering it
  • Whip the cream until you have stiff peaks and gently stir in the remaining sliced bananas
  • Spoon the cream over the top and sprinkle shaved chocolate over the top (you can use a grater to do this or, to get curls, run a potato peeler down the edge of a bar of chocolate)
  • Keep chilled and remove from fridge 15 minutes before serving

[/recipe]
Image

moreposts

2014-03-15 21.33.10

2014-03-15 21.25.56

2014-03-15 21.33.45

Happy Pancake Day Y’all!

British Style!

Image

Today is Shrove Tuesday which is a day observed by some Christians, it’s the day before Ash Wednesday when Lent starts. In some places it is celebrated with Mardi Gras, a carnival celebrating the last indulgence before Lent starts. In little old Britain we celebrate it with Pancake Day! Personally, I love pancakes so I think I prefer our tradition. I believe pancake day came about as a way to use up the eggs and milk you have before you start fasting, at least that’s what I was always told.

Image

Our pancakes are a little different to US pancakes. Ours are more like crepes I guess, I’m not sure what the difference between crepes and pancakes are, I’ve never made crepes (maybe there is no difference, that’s a google for another time) . The traditional way to eat them is with caster sugar and lemon juice, it also happens to be my favourite way to eat them. American pancakes are a different matter, they are best with lots of syrup and bacon yum yum! I love both types equally. Today I had these pancakes, tomorrow we’ll be going out to the original pancake house for some fluffy American pancakes (maybe without the bacon since it’s Ash Wednesday and meat isn’t allowed).

Image

You can put pretty much whatever you like on pancakes though, my other favourites include Nutella and ice cream! The pancake batter is just flour, eggs, milk, salt and a little butter, which means you can pair them with anything savoury or sweet making them super versatile.Let me know your favourite type of pancakes and how you like to eat them in the comments!

Image

When I was younger, pancake day was about stuffing yourself with as many pancakes you could possible cram in, until you couldn’t move for hours. Today, I limited myself to just three like an adult! I only made a little batter since it was only me in the apartment! It’s a really simple batter to make, you just mix flour, eggs, milk, salt and a little butter together until smooth and thin and then you’re ready to go. The secret to making a good pancake is getting your pan really hot and then turning it down to a medium heat just before you pour the batter in. This is much easier to achieve when you have a gas stove (which I don’t here) but you can manage it with electric. My other tip would be to do a test pancake first to see how much batter you need (I find about 3 tbsp is good for a 10″ pan), then use a ladle or something similar to pour the batter in the pan as you want it all in the pan at once so it cooks evenly.

Image

Have a great day everybody. If you observe lent, let me know what you’re giving up in the comments below!

[recipe title=”Pancakes” servings=”6-8 10inch pancakes”]
Ingredients

  • 110g plain flour, sifted
  • pinch of salt
  • 2 eggs
  • 200ml milk
  • 50g unsalted butter

Method

  • Sift the flour and salt into a large mixing bowl from a height so the flour gets a good airing. Make a well in the centre of the flour and break the eggs into it. Whisk the eggs into the flour.
  • Gradually add the milk and continually whisk. Don’t worry about any lumps, they’re disappear as you go. When all the liquid is added, scrape down the sides to make sure its all incorporated.
  • Melt the butter in your pan and add two tablespoons of it to the batter and whisk in. Pour the rest of the melted butter into a bowl and use it to oil your pan, using paper towel to smear it around the pan before each pancake.
  • Now, get the pan really hot and then turn the heat down to medium. Pour the batter into the pan, as soon as the batter hits the pan tip it from side to side to get the base of the pan all covered. It should only take a minute or so to cook, you can lift the edges up with a fish slice to see if its browning. Flip the pancake over (with your fish slice, or with your mad flipping skills if you have them!) the second side will only take a few seconds. Then just slide it out of the pan onto a plate.
  • Stack the pancakes with sheets of parchment paper in between, with the plate on top of a pan of simmering water to keep them warm while you make the rest
  • Serve immediately with the toppings of your choice.
    [/recipe]

Image

moreposts

2014-03-04 16.23.43

Another breakfast bake: Peanut Butter & Chocolate Rolls

2014-03-01 16.08.39

Another British Fave: Viennese Whirls

2014-03-04 16.21.50

Yummy breakfast: Easy Cinnamon Rolls

Ferrero Rocher Cupcakes

The chocolatey, hazelnutty goodness of a Ferrero Rocher, all wrapped up into a yummy cupcake

Image

Chocolate and Hazelnut are a match made in heaven, it’s true, I read it in the bible; “and on the 6th day, God created chocolate and hazelnut in His own image, to spend eternity together. However some old dudes heard Him wrong and wrote it down as Adam and Eve”. That’s how it goes in my bible anyway!

Image

And that is why Ferrero Rocher’s are so yummy. And Nutella. And all things Chocolate Hazelnut. The only way to make them better is to put it in a cupcake. Like I said, heaven!

Image

I promised you guys these cupcakes when I shared my Valentine’s Day cakes, sorry it took me so long I’m the worst, I know! The recipe I used was my fave chocolate cake recipe, in this post I’ll give you the recipe for the chocolate hazelnut swiss meringue buttercream and chocolate hazelnut ganache.

Image

What you wanna do is make up a batch of chocolate cupcakes and let cool.  Make up the ganache, which is double cream, chocolate and Nutella and leave to cool for about 10 minutes, meanwhile cut circles out of the centre of each cupcake, saving the cut outs. Fill the cupcakes with about a teaspoon of the ganache and replace the centres, trimming them where necessary. Make up the swiss meringue buttercream, it takes a while to make but it’s so so worth it. Before you add the Nutella when making it, set about a quarter of it aside to decorate with. There’s a lot of butter in swiss meringue so make sure you’re working in a cool environment when decorating with it. Swirl the Nutella SMBC on top of the cupcakes and drizzle with some of the ganache. Put a swirl of the white vanilla SMBC on top and place half a Ferrero Rocher on top. Yum!

Image
[recipe title=”Chocolate Hazelnut Ganache”]
Ingredients

  • 115g Nutella (or other chocolate hazelnut butter)
  • 120ml double cream
  • 55g dark, good quality, chocolate, chopped

Method

    • In a medium saucepan, heat cream over medium low heat.
    • Stir in Nutella and stir until smooth and combined
    • Add chocolate and stir until melted
    • Leave to cool

[/recipe]
[recipe title=”Chocolate Hazelnut Swiss Meringue Buttercream”]
Ingredients

  • 5 large egg whites
  • 1.5 cup sugar
  • 2 cups unsalted butter, cut into cubes and softened
  • 1/4 tsp salt
  • 1 tbsp vanilla extract
  • 1/2 cup nutella

Method

  •  Whisk together the egg whites and sugar in your stand mixer bowl and place it over simmering water. Heat to about 160 degrees F (about 7 minutes), whisking occasionally
  • Transfer bowl to stand mixer fitted with whisk attachment and beat on medium high speed until mixture cools, doubles in size and forms stiff peaks. This takes about 10 minutes,
  • Switch to the paddle attachment and add butter one piece at a time, mixing to combine after each addition. The mixture may curdle but keep mixing and it’ll come back together don’t worry.
  • Add salt and vanilla and mix to combine. Set aside quarter of the frosting aside for the vanilla portion (if you want just Nutella SMBC obviously you don’t need to do this)
  • Add Nutella to remaining frosting and beat to combine. Use asap.

[/recipe]

Image

moreposts

2014-03-01 15.32.42

Favourite Frostings!

2014-03-01 15.31.13

My Favourite Chocolate Cake!

2014-03-01 15.29.31

Happy Valentine’s Day

Cadbury Chocolate Fingers Birthday Cake!

Cadbury fingers make the best kind of birthday cake!

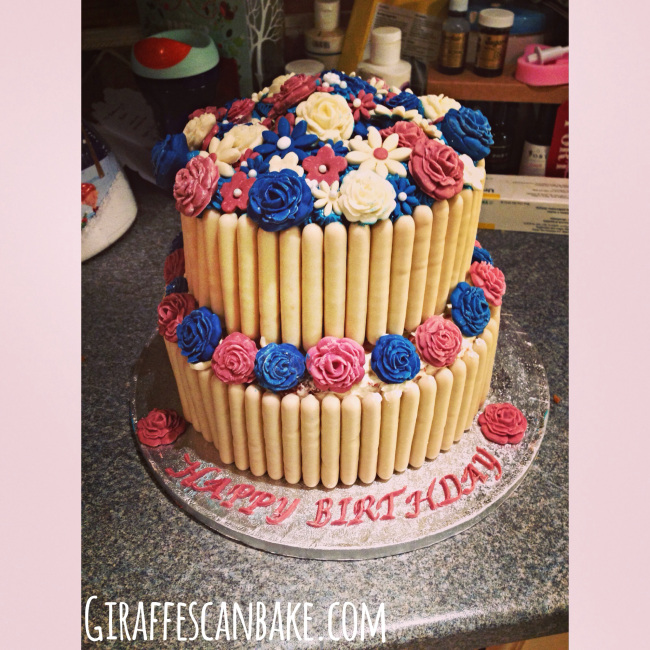
40th Birthday Cadbury Fingers Cake


A friend asked me to make a cake for her friend’s 40th birthday and after some discussion we decided on a cake covered with cadbury fingers. Naturally I was super excited to make it because I LOVE cadbury fingers. She also asked for it to be elegant, and what’s more elegant than roses am I right?! So with the party’s colour scheme in mind I set about creating this cake! It was actually a lot of fun to make and I’m really pleased with how it turned out

40th Birthday Cadbury Fingers Cake

That cake itself is vanilla, filled with fresh whipped cream and strawberry jam. It’s then covered with vanilla swiss meringue buttercream, surrounded by the all important cadbury fingers and decorated with fondant roses and flowers! I am sure you’ve seen similar designs many times before, it’s still one of my favourite ways to decorate a cake though! As soon as I can get my hands on a marble slab somehow, I will definitely make a similar cake with chocolate cigarellos. Cigarellos are no match to cadbury fingers in taste, but they definitely have a more dainty, elegant look!

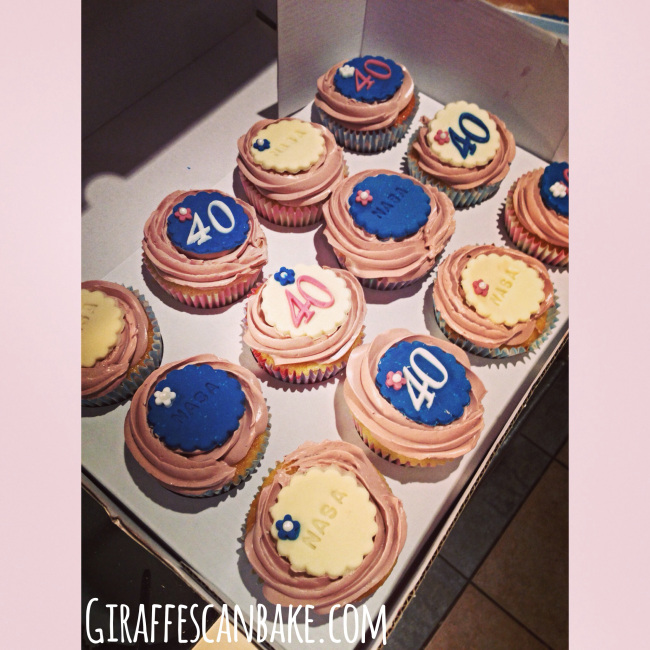
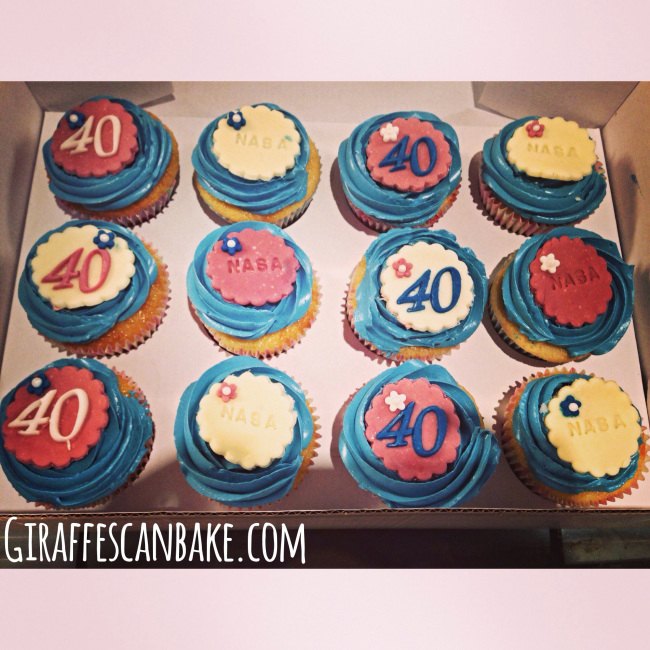
40th Birthday Cupcakes

I also made 60 cupcakes to match, Nasa obviously has a lot more friends than I do! They were all vanilla cake with vanilla swiss meringue buttercream, then decorated to match the colour theme of course. The cupcake toppers were definitely a labour of lover, but they were fun to make and they turned out pretty much how I wanted them too which is always a bonus!

40th Birthday Cupcakes

40th Birthday Cadbury Fingers Cake

40th Birthday Cupcakes

As you may have noticed, this is another post without a recipe attached. I am sorry, I will get up the recipe for the ferrero rocher cupcakes soon, I just wanted to share this cake with you while I don’t have time to write up a recipe or do any baking (“don’t have time” in Michelle language normally translates to “don’t have the energy/am too sick”). I do have plans to bake some chocolate pudding cookies and macarons so maybe I’ll get those up soon too! In the meantime I do hope you enjoy these cakes even if the photos aren’t great!


Have a fab week y’all