"> Nuts - A Tipsy Giraffe - Page 4

Brown Sugar & Pecan Caramel Bundt Cake

Oh my god you guys, Oh. My. God. It’s is Fiesta Friday #20 and I have brought something really special! This brown sugar & pecan caramel pound cake, it is amazing. You NEED to try it. It’s a pound cake but it’s so, so light and moist,  and the brown sugar combined with the toffee and caramel is to die for. I will be making this cake again, several times.

Brown Sugar and Pecan Caramel Bundt Cake - a moist and tender bundt cake stuffed full of pecans and toffee, smothered with thick caramel and topped with pecans!

Leah’s mum has been asking me to make her this cake for a while now after she saw a photo of one on Facebook and I finally got around to doing it for her. I wish I hadn’t waited so long, so many missed opportunities to enjoy this cake. Luckily for me I made enough batter for two bundt tins so I got to have one too!

Brown Sugar and Pecan Caramel Bundt Cake - a moist and tender bundt cake stuffed full of pecans and toffee, smothered with thick caramel and topped with pecans!

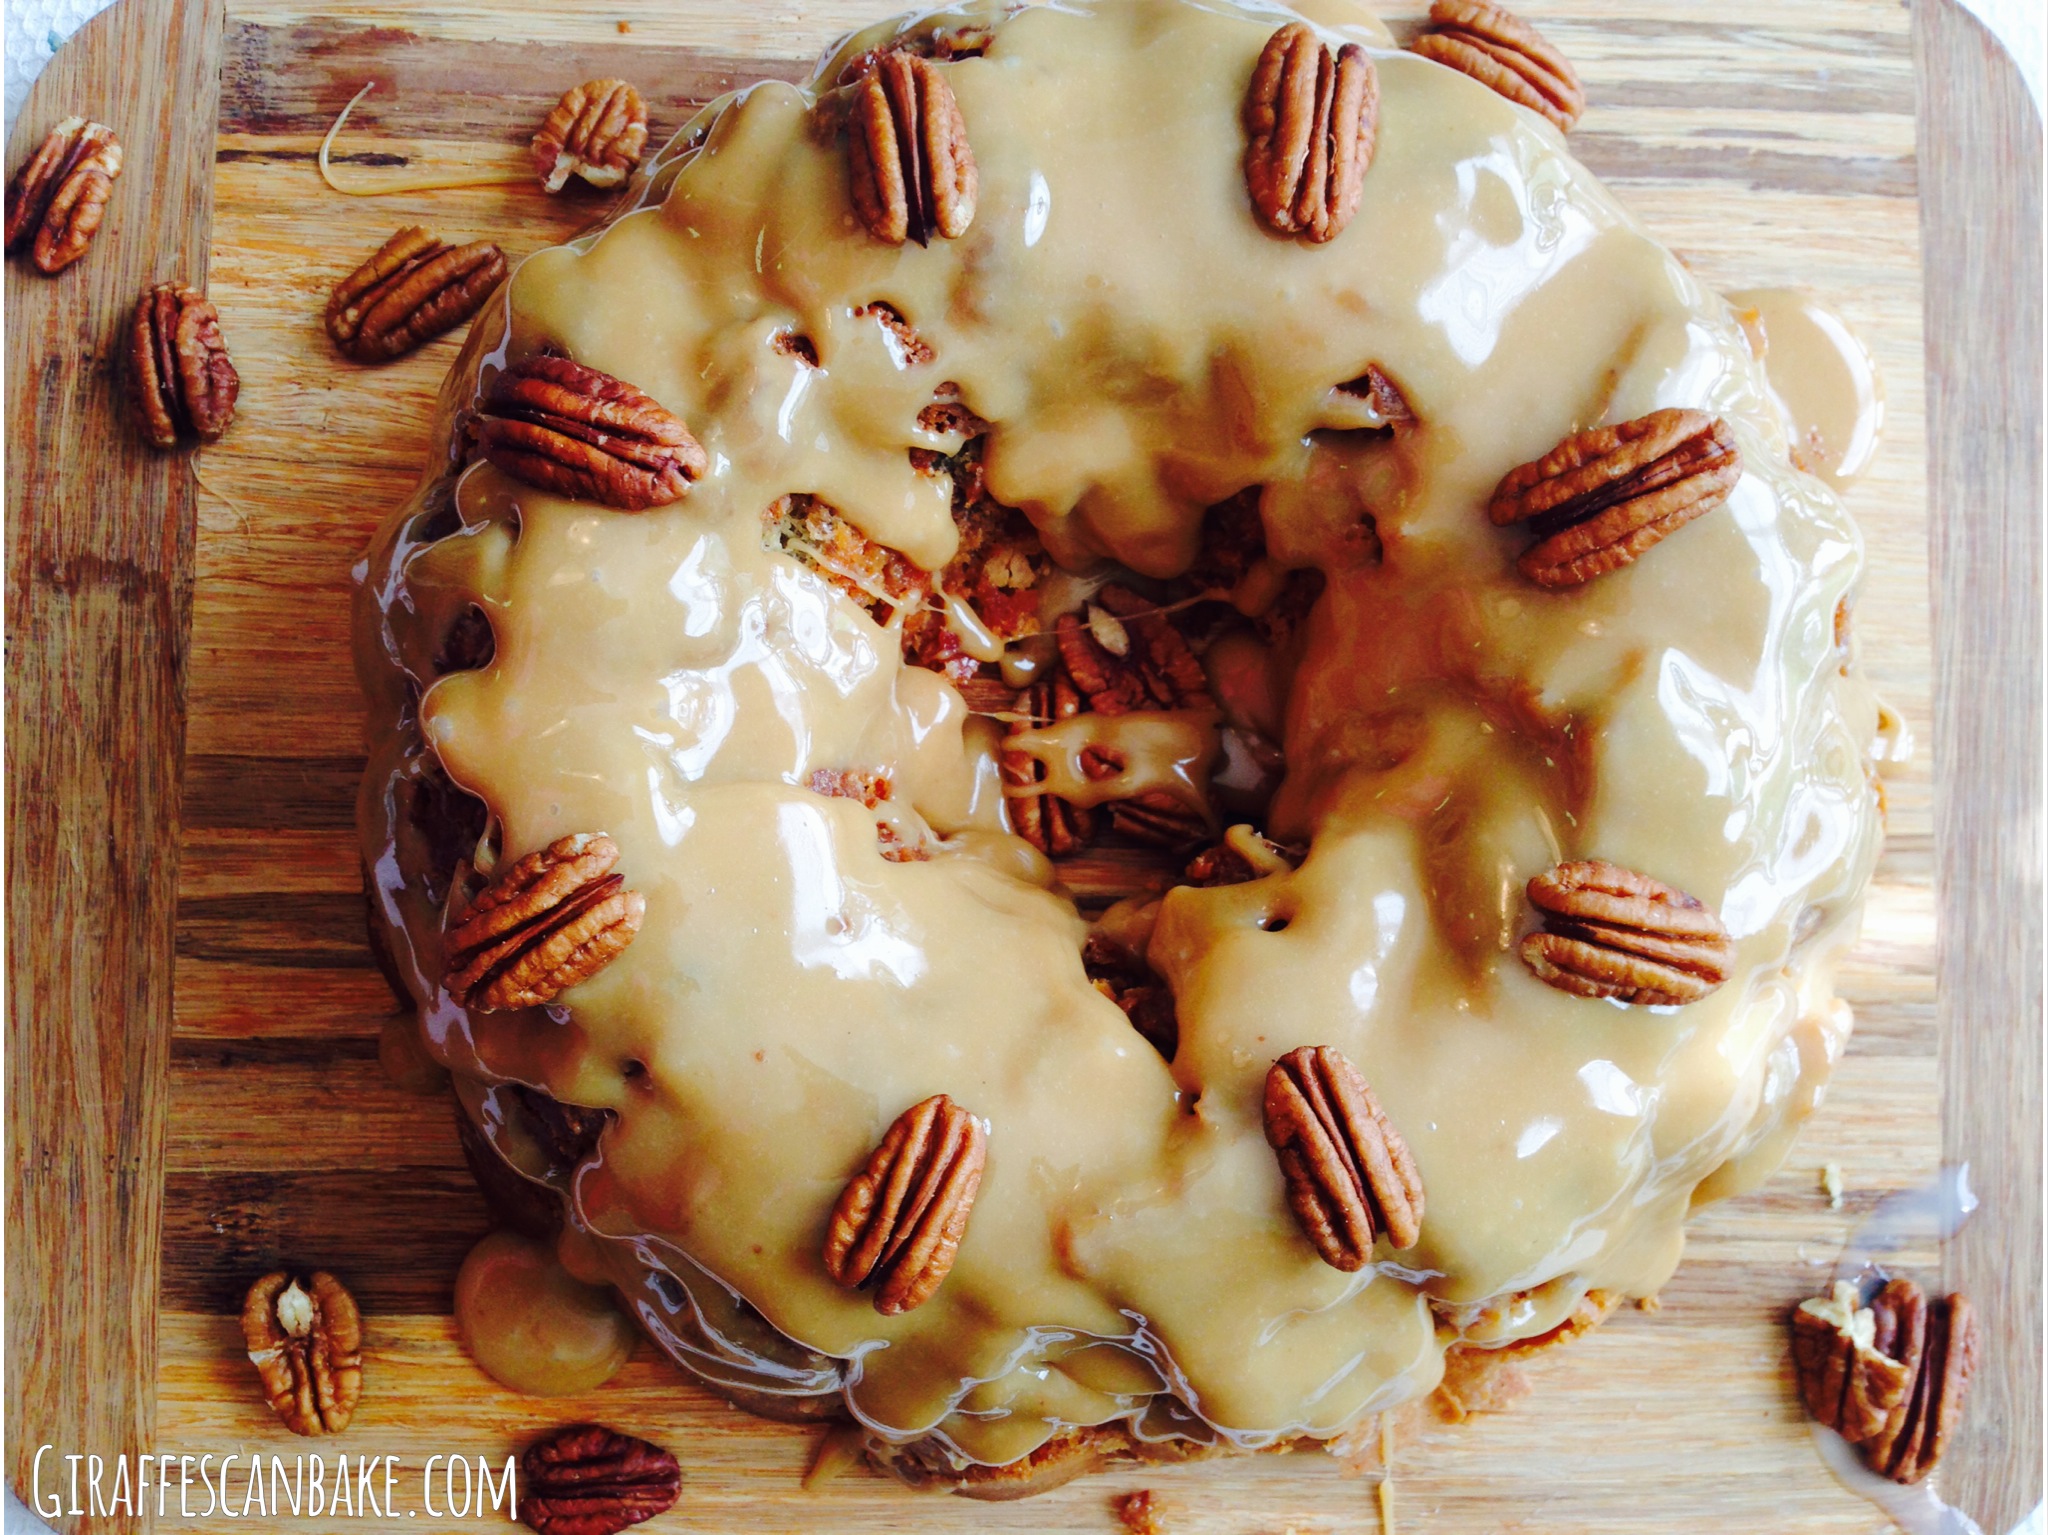
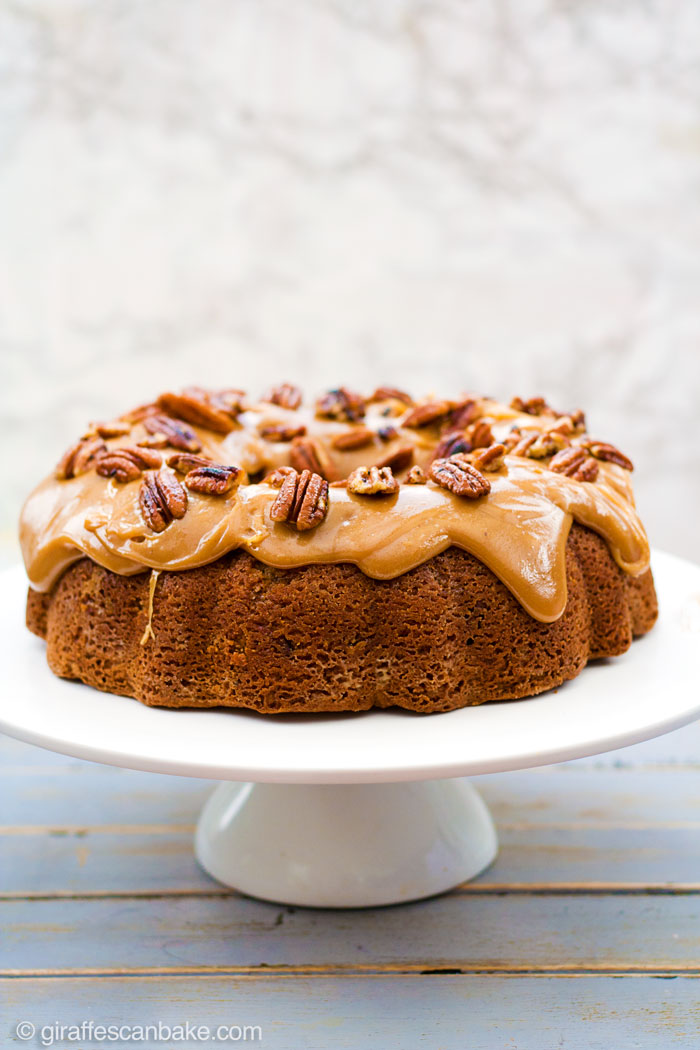
There is a lot of sugar in this cake, mostly brown sugar. And it has chopped pecans nestled inside and lots of yummy heath toffee bits! Then it’s topped with a very generous helping of caramel sauce. So much sweet, caramel flavour in this cake it’s like heaven… and definitely not for the health nuts! But everyone deserves a treat every now and then right?


Brown Sugar and Pecan Caramel Bundt Cake - a moist and tender bundt cake stuffed full of pecans and toffee, smothered with thick caramel and topped with pecans!


Father’s day is this weekend too, and if this isn’t a perfect father’s day cake I don’t know what is! Who needs hallmark when you have this much caramel to indulge in!

Brown Sugar and Pecan Caramel Bundt Cake - a moist and tender bundt cake stuffed full of pecans and toffee, smothered with thick caramel and topped with pecans!


And the best part? It’s so easy to make! You just beat the butter, cream it with the sugar, beat in the eggs and add the dry ingredients and the milk. Stir in your pecans and toffee and bake! Then the caramel sauce is just as easy to make, just heat the condensed milk with sugar, whisk in the butter and vanilla and you’re done. You want to pour on the caramel sauce while it’s still hot as it does harden a little as it cools.

Brown Sugar and Pecan Caramel Bundt Cake - a moist and tender bundt cake stuffed full of pecans and toffee, smothered with thick caramel and topped with pecans!

I’m not sure what else I can say about this cake that isn’t just me gushing about how much I love it! So instead I’ll let you guys try it out for yourselves. It is Fiesta Friday after all, this week’s is co-hosted by Fae and Suzanne so make sure you go check them out! And, of course, a big thanks to Angie for bringing us this wonderful party every week!

I recently updated this recipe with new photos and made it gluten free, make sure you check it out here!

Gluten Free Brown Sugar and Pecan Caramel Bundt Cake - This Gluten Free Brown Sugar and Pecan Caramel Bundt Cake is packed full of pecans and toffee bits, with a moist and tender crumb, smothered in thick, gooey caramel, topped with butter toasted pecans!


[recipe title=”Brown Sugar & Pecan Caramel Pound Cake”]
Ingredients

For the cake:

  • 1 1/2 cups butter, softened
  • 2 cups light brown sugar, packed
  • 1 cup caster sugar
  • 5 large eggs, room temperature
  • 3 cups plain flour
  • 1 tsp baking powder
  • 1/2 tsp salt
  • 1 cup whole milk
  • 1 bag heath toffee bits (8oz)
  • 1 cup pecans, roughly chopped

For the caramel sauce:

  • 1 can sweetened condensed milk (14oz)
  • 1 cup brown sugar
  • 2 tbsp butter
  • 1/2 tsp vanilla extract

Method

  • Preheat oven to 160C/325F. Grease your bundt pan(s) well.
  • Combine the flour, baking powder and salt in a medium bowl and set aside
  • Beat the butter until pale and creamy. Beat in sugars until fluffy.
  • Beat in the eggs one at a time until combined.
  • Add the flour mixture and milk alternatively, starting and ending with the flour. Beat until just combined.
  • Stir in the toffee bits and pecans.
  • Spoon batter into pans and bake for approximately 1 hour and 20 minutes, until skewer comes out clean. After 50 minutes of baking, lightly cover with foil to stop it browning too much at top. Leave to cool in pan for 10 minutes then transfer to wire rack.
  • While cake is cooling make the caramel sauce. In a medium saucepan, combined condensed milk and brown sugar and bring to the boil over a medium high heat, whisking often. Reduce heat and simmer for 8 minutes, whisking often. Remove from heat and whisk in butter and vanilla. Leave to cool for 5 minutes
  • Pour the caramel sauce over the cooled cake, you want to do this while the sauce is still hot as it hardens slightly as it cools.
  • Garnish with more pecan halves, serve

Notes:

  • Make sure you grease your pan well as this is a very moist cake and it can be a bit of a pain to coax out without breaking! I use this home made pan release and it’s great.
  • This cake is great eaten right after you’ve added the sauce, when it’s all warm and gooey (be careful the sauce isn’t too hot, don’t want any burned tongues!)
  • This recipe will make one 12 cup bundt pan cake, or almost two 6 cup bundt pan cakes (I had one slightly smaller one)
  • Store in an airtight container for 3-5 days

[/recipe]

Brown Sugar and Pecan Caramel Bundt Cake - a moist and tender bundt cake stuffed full of pecans and toffee, smothered with thick caramel and topped with pecans!


Pistachio Macarons


Pistachio Macarons

I have a baker’s confession to make; I have lived in the south east of England for the majority of my life and I have never once been to Paris. It’s shameful, I know. I’m just a train ride away from so many beautiful and classic baked delicacies  and I’ve never taken advantage of it. I don’t know how I live with myself to be quite honest (Note: I have been to France, once, but not Paris). It’s okay, I understand if you want to publicly shame me for this, you can do so in the comments!

Pistachio Macarons

My second confession as a baker is I’m not a huge fan of macarons. You can argue with me about the correct spelling, but in England a macaroon is a coconut cookie (see here). Okay, back to the French cookie, I don’t dislike them but they’ll never be my first choice and I don’t really get what all the fuss is about. Yet, I still made it my mission to make successful macarons – just to prove I could. Baking is kind of a competition to me, where I’m competing with my own self doubt. And when my self doubt wins, well I tend to throw a little tantrum and refuse to attempt it again for years! The first time I tried to make macarons it was a bit of a disaster, that was about 3 years ago. Fast forward to 2014 and here I am, a successful macaron baker! Yay me!

Pistachio Macarons

Okay, so they’re definitely not the prettiest macarons but they ARE macarons. These pistachio macarons are light and fluffy, they have feet and they’re super tasty (according to the macaron lovers I had taste test them!). My biggest issues in making this were trying to grind the pistachios in a mini food processor (I definitely didn’t have a smooth enough batter) and my oven temperature in Atlanta is a bit wonky so baking time was a guessing game! Overall though, I’m very pleased with how they came out. I had planned to never make them again after I got them right, but I think a couple people may have something to say about that unfortunately! Oh well, I bake to please!

Pistachio Macarons

Before making these I did lots of internet research to find tips on how to make them successfully and found an excellent post from Food Nouveau. That post is definitely your one stop shop on the world of making macarons, it has everything you need to know with really clear instructions! They also have a link to a bunch of different flavour recipes too! One of the tips they give is to make plain macarons your first time out, of course I didn’t listen! I really like pistachio and I thought this was going to be my only time making them. I’m a rebel, what can I say! That being said, if this is your first time making macarons, I implore you to read that whole post before attempting this recipe as I won’t be able to go into as much detail as they did.

Pistachio Macarons

Another rule I didn’t follow is the ageing of the egg whites. I’m an impatient fool and I wanted to make them right then! Honestly I don’t think it’s entirely necessary (but who knows, maybe I would have had a smoother batter if I’d aged them). What I did was place the whole eggs in warm water for about 3 minutes before separating them. One tip that is important to follow though is exact measurements for the cookies, you need a scale rather than cups to be as accurate as possible.

[recipe title=”Pistachio Macarons”]
Ingredients

For the cookies:

  • 3 egg whites, room temperature
  • 205 g icing sugar
  • 125 g powdered almonds (almond flour/meal)
  • 20 g unsalted and shelled pistachios
  • 30 g caster sugar
  • Green gel food colouring

For the buttercream:

  • 45 g unsalted and shelled pistachios
  • 1 cup icing sugar
  • 6 tbsp butter, unsalted
  • ½ tsp vanilla extract

Method

To make the cookies:

  • Finely grind the pistachios in a food processor. Add the icing sugar and powdered almond and grind for a few minutes. Sift the mixture into a large bowl to ensure no larger lumps remain, throw away anything that doesn’t make it through the sieve. Set aside.
  • Whisk the egg whites on a medium/high speed in a stand mixer for a couple of minutes, then add a tablespoon of the caster sugar. Continue to beat while you slowly add the remaining sugar. Beat until the egg whites are stiff and creamy.
  • Fold in the food colouring gently with a rubber spatula, add a few drops at a time until you get your desired colour.
  • Very delicately fold in the nut and icing sugar mixture in a few additions. Make sure no pockets of dry ingredients remain but do not beat!
  • Prepare your baking sheet by lining with parchment paper. I also slipped a template underneath to get my cookies evenly sized (this is the template I used), just make sure to slide the template out before placing the baking sheet in the oven
  • Spoon your batter into a piping bag fitted with a 1/2 inch round tip and pipe rounds of batter, evenly spaced. They can be close together as they won’t expand much.
  • Let your macarons rest on the baking sheet for a minimum of 20 minutes, I left mine for about 45 minutes. Make sure a skin has formed before baking. Preheat the oven to 300F/150C.
  • Bake macarons for about 15 minutes. You can test them by gently tapping the top, they are ready when they are firm on their feet.
  • Leave the cool while you make the buttercream

To make the buttercream:

  • Finely grind the pistachios in the food processor. Add the icing sugar and grind some more.
  • Cream this mixture with the softened butter until you reach a buttercream like consistency.
  • Blend in the vanilla extract. If the mixture is too thick, add a little bit of cream or milk until you get the right consistency (and vice versa)
  • Pipe the buttercream onto the flat side of one cookie and sandwich with another, repeat for all cookies
  • Store at room temperature in an air tight container. They’ll taste even better the next day!

[/recipe]
Pistachio Macarons


moreposts


2014-03-24 00.06.56


2014-03-24 00.08.57

2014-03-19 15.38.59


Happy Valentine’s Day

Why have one Valentine’s cake when you can have three!

Image

I bought some super cute Wilton heart pans, they’re only 4″ across but they make for super adorable little heart cakes which are perfect for valentine’s day. Or, if you prefer, “I love me” day! Plus they were only $10 in Target!

Image

I made these for my best friend/other half. I have a terrible track record of messing up cakes I make for her (there’s a certain Mondrian birthday cake we do not talk about) but these turned out really great looking and taste just as good!

Image

All three are the same flavour, I did consider making three different flavours but who has the time for that in one day! They’re chocolate and hazelnut, one of my favourite flavours ever (and also the flavour she chose). Don’t give me access to a jar of nutella and a spoon because the whole thing will be gone in a day! Yum, yum, yummy!

Image

These are my fave chocolate cake recipe with chocolate hazelnut ganache and chocolate hazelnut swiss meringue buttercream. Seeing as I did all three the same flavour, I got creative with the decorating. The first is the Ferrero Rocher cake, the sides are covered with chocolate hazelnut SMBC and chopped hazelnuts and then topped with chocolate hazelnut ganache. There are also a few ferrero rochers hiding inside the cake too!

Image

 Image

The second is filled with the SMBC and ganache, then covered in SMBC. Then I surrounded it with Cadbury’s Chocolate Fingers and topped it with V Day themed M&M’s. I know this design has been done by everybody and their mother, but it’s one of my favourite designs and one I’ll never get tired of (There’s a two tier cake I did last month with chocolate fingers that I’ve not shared with y’all yet and it’s one of my favourites!). Besides, cadbury fingers are like crack, how could you ever get bored of them?!

Image

The last is my least favourite. It’s filled with the SMBC and ganache and then decorated with the SMBC in kind of roses. The problem I had here was I was using a large open star nozzle to do the roses (I’m currently in Atlanta so don’t have all my decorating supplies to hand) which is doomed to fail considering the cake is only a 4″! Plus it was snowing and icy outside so the heating was nice and high, giving me a very unworkable buttercream, with the amount of butter there is in SMBC working in warm temperatures is never easy!

Image

I also made some cupcakes to go with them because why not! There’s a lot of cake in this apartment right now (such a horrid problem to have, I know!). I’m gonna do a full post on the cupcakes with the recipe (which I used for all three cakes and the cupcakes) next week. For now here’s a taster:

Image

I hope you all have a lovely Valentine’s Day! If you’re not celebrating it or hate it, then I hope you have a happy Friday with lots of love and happiness! If you’re single today, please don’t be sad about it, go out and buy yourself something nice because you are fab and you deserve it! And whether or not you’re in a relationship, treat somebody you love to something nice, even if it’s just some nice words or some novelty chocolate, while I agree you should love and appreciate those you care about all year round today is a great day to spoil them a little extra 🙂 Have a great day my lovelies, I’ll see you next week!

Image

Image

Image

Image

More chocolately goodness on Giraffes Can Bake that you might like:

2014-01-11 23.15.022013-09-11 14.56.02   2013-07-16 15.40.34

Pumpkin Pecan Pie

Image

Happy Hallowe’en everybody! I won’t lie to you, I’m not Hallowe’en’s biggest fan. But I do love pumpkin and spices and pecans and dressing up (I dressed up as a sickly person in her pjs this year). I have never made pumpkin pie before, I’ve never even eaten pumpkin pie before! But I love everything that goes into it so I figured why not be festive! I decided to add a pecan topping because I think I’ve spent too much time in Atlanta). The pie itself turned out great, I mean I’ve never eaten pumpkin pie so maybe I got it completely wrong, but it was scrummy so either way I’m happy. I’m a great lover of autumn spices, I associate them more with Christmas (see below re: lack of autumn holidays here) but I’m a firm believer that you should bake with cinnamon, nutmeg and allspice all year round.

Image

I think this pumpkin pie post needs a little disclaimer before we continue – this pie doesn’t actually contain any pumpkin. I made this with butternut squash. Hallowe’en isn’t that big of a holiday in the UK and we obviously don’t have thanksgiving, with those being the two big pumpkin holidays we don’t have a plethora of choice when it comes to pumpkins. Just before halloween you can buy pumpkins for carving, but I wouldn’t recommend baking with them. But fun fact: a lot of canned pumpkin is actually butternut squash anyway (they use butternut squash as it’s less stringy, sweeter and a better colour) so I’m not really cheating here! Maybe I should have called it Butternut Squash Pie, but that just doesn’t sound as festive!

Image

Paul Hollywood would not be impressed with my soggy bottom (I over greased the pan, oops)

I have another small confession, I made two pies. The first pie I used a ready made pie crust because I didn’t want to bother making my own pastry (did I mention I was a sickly pj lady today?) and I don’t actually own a pie dish. However it was much shallower than I anticipated and all the pumpkin filling spilled out and I was left with an accidental (but tasty) pecan pie. My mum enjoyed the accidental pecan pie so it wasn’t a complete loss!

Image

Who said the pie filling actually has to be in the pie crust anyway???

I couldn’t bear to just leave it at that so I decided to suck it up and make my own pastry (admittedly this decision was after a failed attempt to buy ready made shortcrust at Tesco), after all shortcrust pastry is pretty much the easiest pastry to make. I will include the recipe for that, but don’t feel bad if you use ready made, I would have if I could have. My philosophy is life’s too short to make your own pastry!

Image

I know you’re jealous of my giraffe print knives

Time to get down to business then!

Ingredients

For the Sweet Shortcrust Pastry: 

  • 225g  plain flour (plus extra for dusting)
  • 110g butter
  • 80g caster sugar
  • 1 large egg
  • 1/2 – 1  tbsp milk
  • pinch of ground cinnamon (optional – you can substitute with other flavours, but try not to over power with flavour)

For the Pumpkin Filling: 

  • 500g butternut squash, cooked and pureed
  • 1 (397g) tin condensed milk
  • 2 eggs, beaten
  • 175g dark brown soft sugar
  • 1 teaspoon ground cinnamon
  • 1/2 teaspoon ground ginger
  • 1/2 teaspoon ground nutmeg
  • 1/3 teaspoon ground allspice
  • 1/2 teaspoon salt

For the Pecan Topping:

  • 220g golden syrup
  • 115g caster sugar
  • 2 large eggs
  • 3 tablespoons butter, melted
  • 1/2 teaspoon vanilla extract
  • 200g pecan halves

Method

For the pastry:

Line the bottom of an 8inch pie dish (or sandwich cake tin if you’re improvising like me!) with greaseproof paper and very lightly grease sides of dish.

Put the flour and butter into a bowl and rub the butter into flour until you have fine crumb mixture. Stir in the sugar and cinnamon (if using). Mix in the egg and enough milk to form a soft dough. Try not to work the dough too much as you don’t want to melt the butter. Wrap in cling film and place in fridge to chill for at least 15-30 minutes.

Dust work surface with flour and roll out pastry to a 1/2cm thickness. Transfer to pie dish and lightly press into the bottom and into edges. If you tear the pastry, just fix holes with pastry cut offs. Set aside.

Image

Make shift pie dish

For the pie filling:

Preheat oven to 200C/ 400F/ Gas mark 6.

Line a baking tray with foil and light oil. Halve butternut squash length wise and scoop out the seeds and stringy bits and remove stem. Place squash halves cut side down on baking tray and pour 50ml water into tray. Loosely cover with foil and bake in oven for 50 minutes or until flesh is tender.

Image

Remove from oven and leave to cool. Scoop flesh from peel and put into food mixer, blend until you have a smooth puree. Measure out 500g and set aside (if you have any remaining squash, reserve excess for another use like yummy mash potato).

Image

Look at that bright orange, you’d never get that naturally with a pumpkin!

In a large bowl and hand mixer, beat the squash with condensed milk, eggs, sugar, spices and salt. Pour into the unbaked pastry case, leaving a space for the pecan topping.

For the pecan topping:

Combine the golden syrup, sugar, eggs, melted butter and vanilla extract in a bowl and stir in the pecans. Pour on top of pumpkin layer.

Bake in the oven at 200C/400F/Gas 6 for 50 minutes or until a knife inserted comes out clean.

Leave to cool in dish for 10 minutes and then and turn out onto wire rack, leave to cool completely.

Serve with freshly whipped cream, yum!

Image

I used a number of recipes from the internet to come up with this recipe. Those that I still have the links for are here and here